
Showing posts with label Stitch Samplers. Show all posts
Showing posts with label Stitch Samplers. Show all posts
Tuesday, September 15, 2020
Asks and Answers: Dragon Sampler

Tuesday, September 5, 2017
So many ideas, so little time!!!
Much has been afoot in Studio 508 of late. In June I began Sue Stone's "Exploring Texture and Pattern" on-line course. If you ever want to go deeply into a study of the simplest of stitches, to analyze what you've done, how you can improve it, how it might fit into future work, this could be something for you to investigate.
From the course, some wellspring of creativity has been tapped (no; wellspring sounds so tame and patient, but you get the idea), and I have samples in stacks (literally dozens) and several pieces done or in progress. I have also followed paths not really part of the course, but I kept asking questions as I evaluated the work and found these solutions . . . More about that another time. The online group is very supportive of one another, very kind. I think that really makes a difference.
Not surprisingly, my penchant for sewing funky clothing has been tweaked. The last blouse I made is completely reversible because I bound all the seams. And I am ready to cut out a pair of Diane Erickson-designed pants with the most interesting lower edges . . . She has a book on sixty ideas for pockets that just came in the mail to me And then there is Jane Dunnewold's Finding a Visual Language to be studied, or should I open Creative Strength Training first? All these decisions, while bowls of bright thread wait for their play-date on my embroidery table.
Fortunately, I am beginning to understand the MIT theory of organizing the day (Most Important Thing), and I don't enter the studio empty-handed anymore; my list is clutched tightly in hand, and though I still chase a few shiny objects along the way, I am not in full chase mode most days. When everything is quiet, when I need a moment to reflect, I take a box of Thrift Store clothing and begin to unpick the seams. That is almost as zen-like as sewing long lines of stitches.
This from the on-going class-- a piece of fabric strip weaving, where I took a leap of faith and decided to use re-cycled sari ribbon strips. The entire process became a nightmare, because nothing wanted to lie flat, to stay where it was pinned, and only densely-packed stitches saved the day here.

Life can still race along in the fast lane, even for a retiree!
From the course, some wellspring of creativity has been tapped (no; wellspring sounds so tame and patient, but you get the idea), and I have samples in stacks (literally dozens) and several pieces done or in progress. I have also followed paths not really part of the course, but I kept asking questions as I evaluated the work and found these solutions . . . More about that another time. The online group is very supportive of one another, very kind. I think that really makes a difference.
Not surprisingly, my penchant for sewing funky clothing has been tweaked. The last blouse I made is completely reversible because I bound all the seams. And I am ready to cut out a pair of Diane Erickson-designed pants with the most interesting lower edges . . . She has a book on sixty ideas for pockets that just came in the mail to me And then there is Jane Dunnewold's Finding a Visual Language to be studied, or should I open Creative Strength Training first? All these decisions, while bowls of bright thread wait for their play-date on my embroidery table.
Fortunately, I am beginning to understand the MIT theory of organizing the day (Most Important Thing), and I don't enter the studio empty-handed anymore; my list is clutched tightly in hand, and though I still chase a few shiny objects along the way, I am not in full chase mode most days. When everything is quiet, when I need a moment to reflect, I take a box of Thrift Store clothing and begin to unpick the seams. That is almost as zen-like as sewing long lines of stitches.
This from the on-going class-- a piece of fabric strip weaving, where I took a leap of faith and decided to use re-cycled sari ribbon strips. The entire process became a nightmare, because nothing wanted to lie flat, to stay where it was pinned, and only densely-packed stitches saved the day here.

Life can still race along in the fast lane, even for a retiree!
Monday, May 15, 2017
Stitch Sampling
This article from TextileArtist.org is a nice read if you have ever wondered about the value of sampling stitches or techniques before you start a project.
Sampling can be addictive. It's all about the "What ifs" that keep popping up as you try one thing, then make some small alteration to the process or color or thread weight and try it again. Even better is when you let one idea link to another and another . . .
The reward of all this curiosity spread across small pieces of fabric is that the samples are making your own encyclopedia of stitch and technique ideas as they begin to fill a box or a bin. Notebooks with cloth pages (the holes are made with buttonholes) hold mine. I've even used Pellon as a page, which keeps the pages from folding over in the thick binders.
If you searched the dark corners of your own studio space, how many samples could you collect? Enough to fill your own ring-binder notebook? Maybe two notebooks? My favorite ones are where I start out a little loose and not so nice, but as the stitching continues, I can see the improvement I make. Seeing where you came from is often a great teacher. And mistakes might be the best teacher of all, because we learn more from mistakes than doing things perfectly the first time.
Don't forget other fabric techniques-- Felting experiments can lead to a new direction in wet or dry felting. Fabric manipulation gives texture, whether perfectly or imperfectly worked. What about painted Lutradur or Bond-A-Web, heat-manipulated surfaces . . .
Take a moment to read the article about sampling as a creative process. It might be the impetus you need to start your next project!
Sampling can be addictive. It's all about the "What ifs" that keep popping up as you try one thing, then make some small alteration to the process or color or thread weight and try it again. Even better is when you let one idea link to another and another . . .
The reward of all this curiosity spread across small pieces of fabric is that the samples are making your own encyclopedia of stitch and technique ideas as they begin to fill a box or a bin. Notebooks with cloth pages (the holes are made with buttonholes) hold mine. I've even used Pellon as a page, which keeps the pages from folding over in the thick binders.
If you searched the dark corners of your own studio space, how many samples could you collect? Enough to fill your own ring-binder notebook? Maybe two notebooks? My favorite ones are where I start out a little loose and not so nice, but as the stitching continues, I can see the improvement I make. Seeing where you came from is often a great teacher. And mistakes might be the best teacher of all, because we learn more from mistakes than doing things perfectly the first time.
Don't forget other fabric techniques-- Felting experiments can lead to a new direction in wet or dry felting. Fabric manipulation gives texture, whether perfectly or imperfectly worked. What about painted Lutradur or Bond-A-Web, heat-manipulated surfaces . . .
Take a moment to read the article about sampling as a creative process. It might be the impetus you need to start your next project!
Tuesday, February 24, 2015
Zen Tangles and Stitching
Besides the Knoxville FreeStyle EGA group, I am a member of the Atlanta EGA group, Stitching With A Twist. This group is working on a project that will require our developing zen tangles that we stitch-- "tangling," it is called. My problem is that I can't draw a tangle and then stitch it. I think in reverse. To me, it is easier to think of stitches that will work in a zen tangle and then draw the tangle based on those stitches rather than the other way around.
This is the beginning of my little sampler of possible tangling stitches (somehow, calling a stitch a "tangling stitch" sends the wrong message). It is stitched mostly in a single strand of cotton floss, and, at lower center, with some DMC matt cotton the weight of a wool tapestry yarn:

There as many stitches on the "won't work" Doodle Cloth as this Sample! A nice occupation for a snowy February day.
This is the beginning of my little sampler of possible tangling stitches (somehow, calling a stitch a "tangling stitch" sends the wrong message). It is stitched mostly in a single strand of cotton floss, and, at lower center, with some DMC matt cotton the weight of a wool tapestry yarn:
There as many stitches on the "won't work" Doodle Cloth as this Sample! A nice occupation for a snowy February day.
Tuesday, January 8, 2013
Uber Texture
Here is my sampler of Extreme Texture in Buttonhole Stitch.

There is a marvelous collection of non-traditional thread in my studio. Much from weaving, crochet, and some just because they are wonderful to touch. I set out to see what could be stitched with reasonable ease, and I found that almost anything can be used for high-textural interest. The “ease” part is colored by how the world is treating me on the day of stitching.
I gathered an assortment of these non-traditional beauties and sampled them for textural possibilities. The fibers included nettle yarn, linen, hand-spun silk (really rough and slubbed), reclaimed sari silk ribbon and sari silk yarn, hemp, banana fiber, some Habu chenille and a stiff, thin silk, silk paper thread, raw silk, finely drawn and flattened silk, cottons fat and skinny . . . . . . the list is a long and fun one.
I chose to use Buttonhole Stitch because it is an open loop that does not make multiple passes through a single hole in the fabric the way a traditional Chain Stitch does, and it can be enlarged or shrunk down, overlapped or stitched in a single line. In all these variations, it retains its character. Most importantly, it accommodates a large range of fibers.
I found a number of the yarns at Darn Good Yarn, a shop that is pure eye candy for unusual yarns. Others I have picked up as Charles and I travelled, some are from like-minded friends. In a small moleskin sketchbook I placed samples of the fibers and made notes on the stitching. Between the sampler and the notebook I have as complete a reference as I could make from the stitching, and there is a small amount of space left at the bottom of the fabric so I can continue to scan the horizon for more candidate threads.
What fun this was!
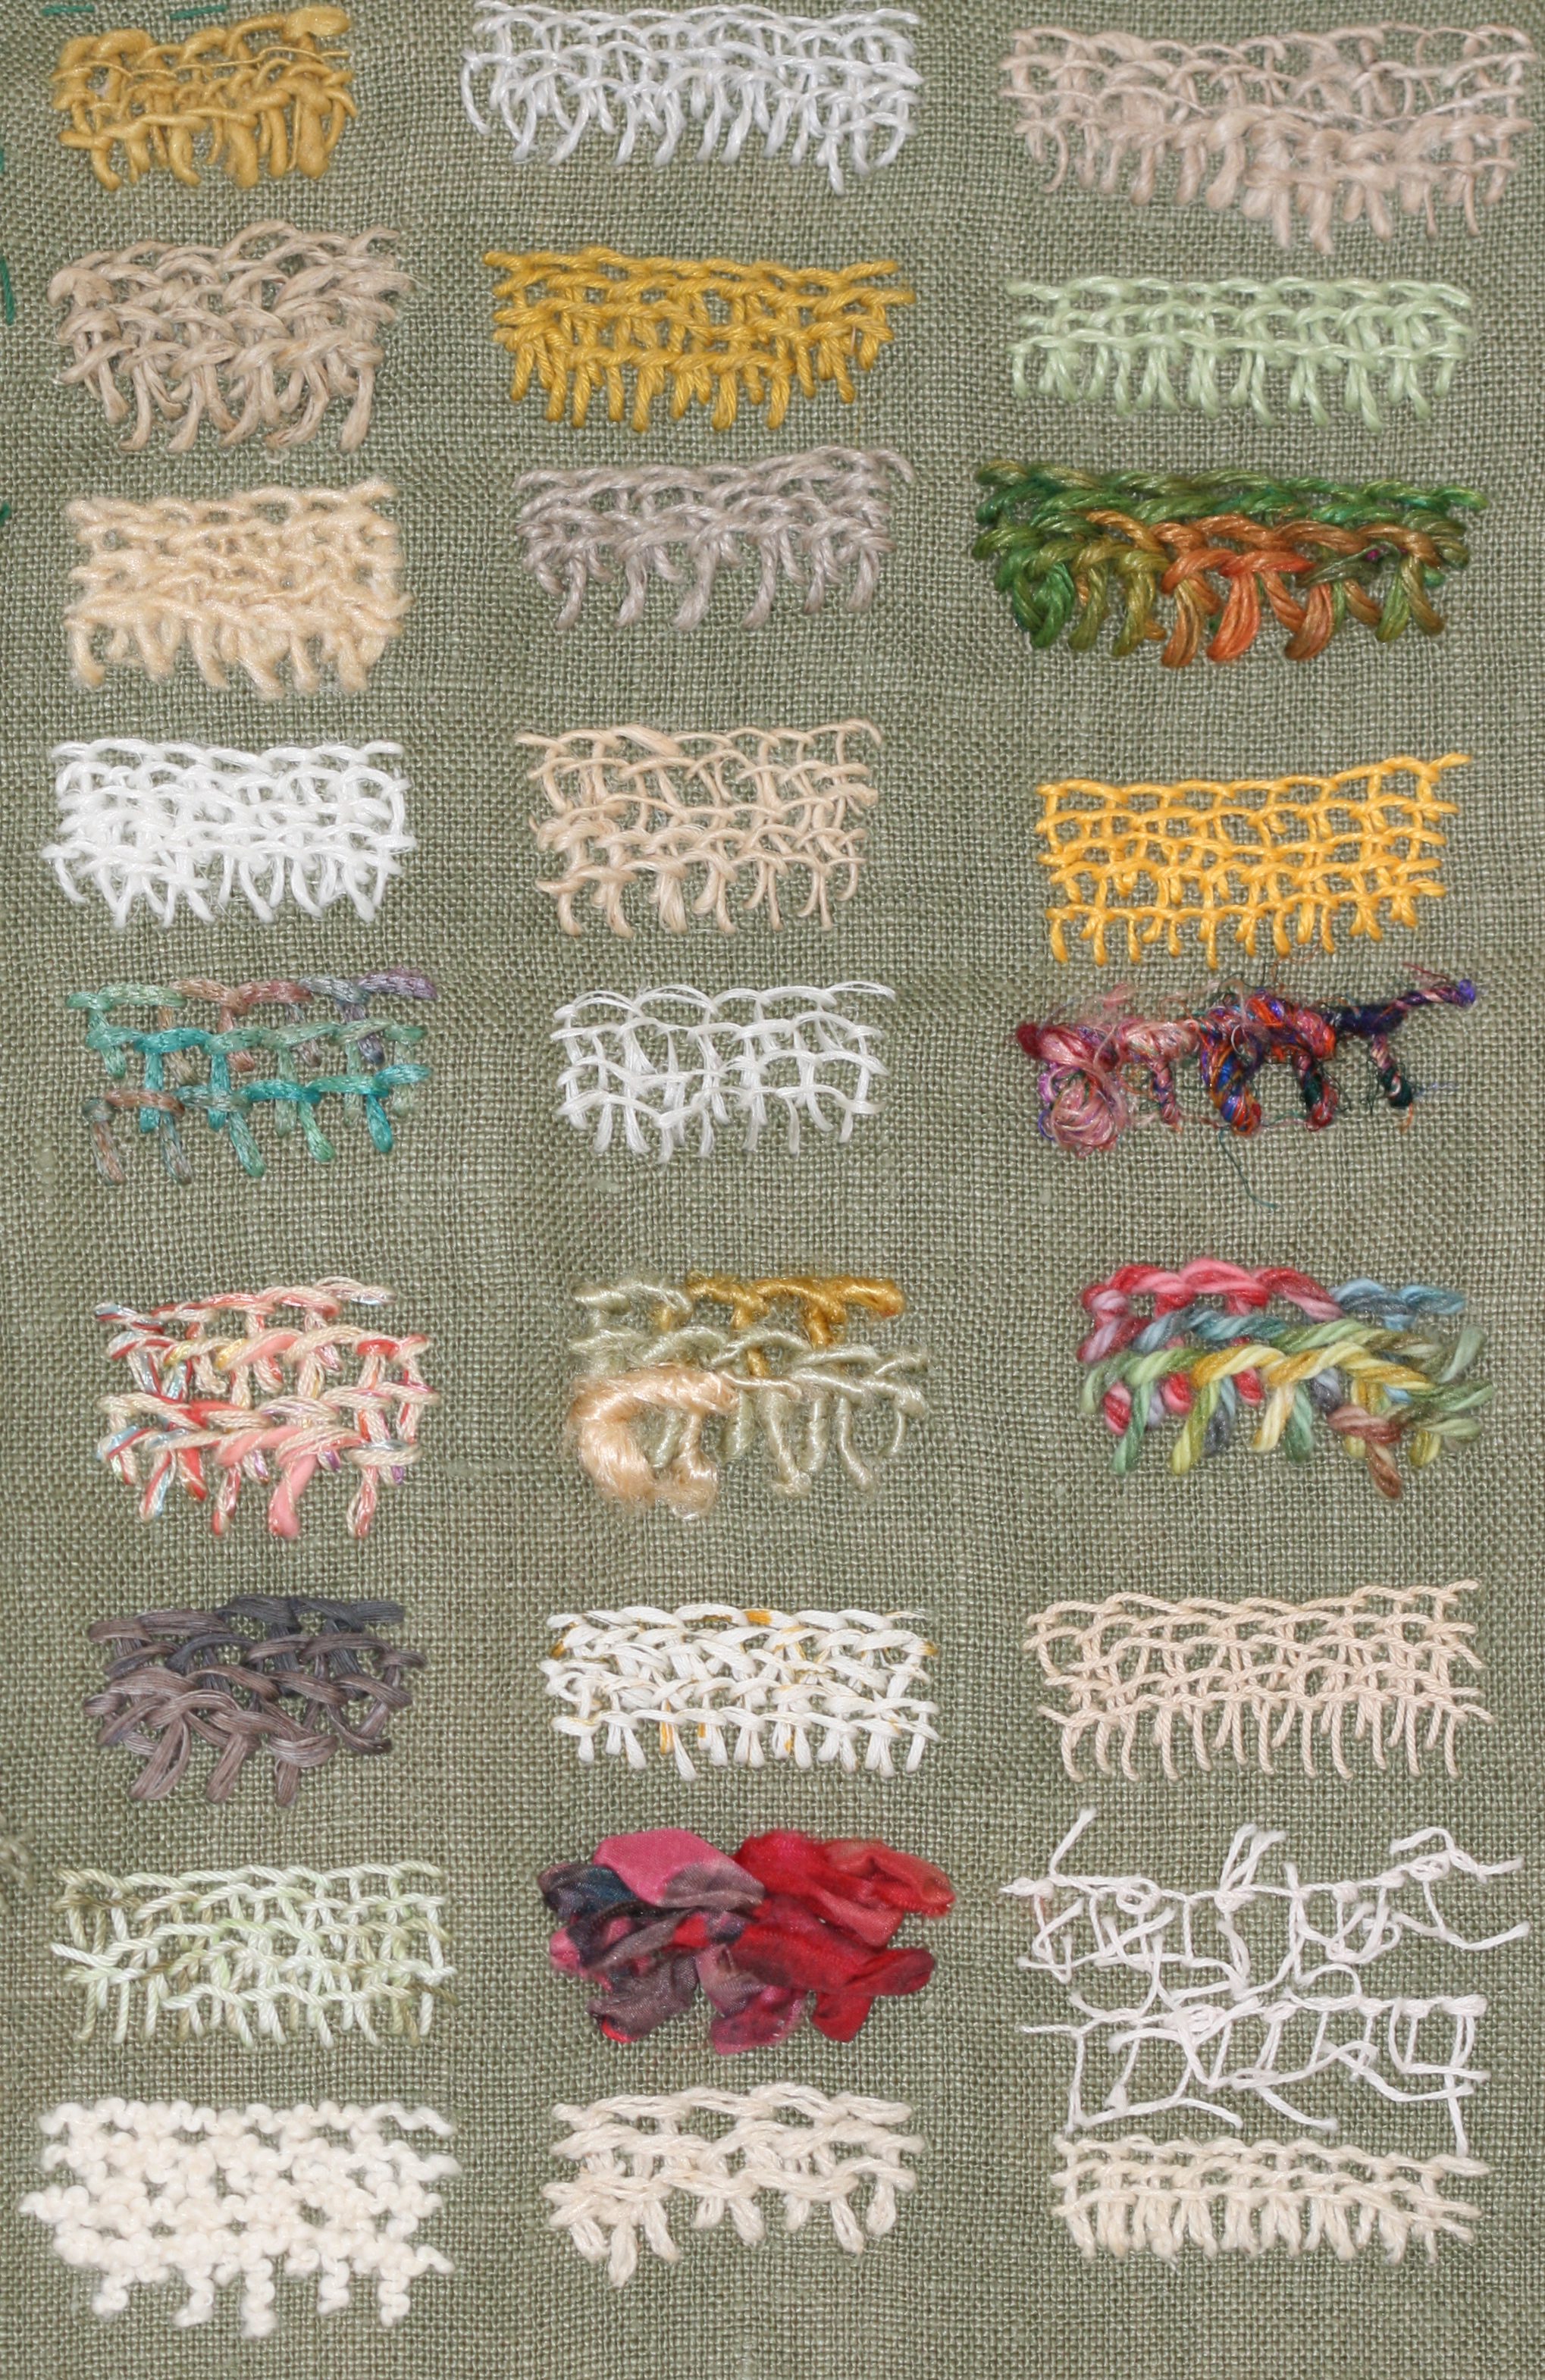
There is a marvelous collection of non-traditional thread in my studio. Much from weaving, crochet, and some just because they are wonderful to touch. I set out to see what could be stitched with reasonable ease, and I found that almost anything can be used for high-textural interest. The “ease” part is colored by how the world is treating me on the day of stitching.
I gathered an assortment of these non-traditional beauties and sampled them for textural possibilities. The fibers included nettle yarn, linen, hand-spun silk (really rough and slubbed), reclaimed sari silk ribbon and sari silk yarn, hemp, banana fiber, some Habu chenille and a stiff, thin silk, silk paper thread, raw silk, finely drawn and flattened silk, cottons fat and skinny . . . . . . the list is a long and fun one.
I chose to use Buttonhole Stitch because it is an open loop that does not make multiple passes through a single hole in the fabric the way a traditional Chain Stitch does, and it can be enlarged or shrunk down, overlapped or stitched in a single line. In all these variations, it retains its character. Most importantly, it accommodates a large range of fibers.
I found a number of the yarns at Darn Good Yarn, a shop that is pure eye candy for unusual yarns. Others I have picked up as Charles and I travelled, some are from like-minded friends. In a small moleskin sketchbook I placed samples of the fibers and made notes on the stitching. Between the sampler and the notebook I have as complete a reference as I could make from the stitching, and there is a small amount of space left at the bottom of the fabric so I can continue to scan the horizon for more candidate threads.
What fun this was!
Wednesday, December 19, 2012
Drawing with thread in a loose, painterly way

This small sample, only 4 1/2″
square, is the result of wondering what threads would be best for
drawing and sketching with a needle. I wanted to be able to make quick,
sometimes unruly lines rather than the smooth ones that are
characteristic of most embroidery— a sort of drawing with pencil rather
than painting with acrylics or oils.
I discovered that linen makes the best line drawings. It stands away from the fabric, is a little stiff and sometimes unmanageable, but always interesting. It looks a lot like the rough sketches I sometimes make when doodling or thinking quickly with pen and paper. In the upper left corner is a little snippet of sari silk yarn, which reminds me not to take myself too seriously when I am “what-if-ing.”
Sunday, November 18, 2012
Waving Line Sampler (s)
First is the Doodle Cloth, where the fun thinking and splashy experimenting was going on:

Then, the results moved to the canvas of what was the "real" sampler. These next shots are of sections of that second, more thoughtful stitched sampler, up close and personal.

I included the funky edge because it is meant to be a fun, playful sampler.

The returning curve below, on right, is a Herringbone Stitch taken to extreme angles, but kept small. It reminds me of prickly thorn vines.

The variegated Satin Stitch surprised me at how much fun it was to stitch. Tedious, yes, but the precision it required was rewarding. The coil is Double Knots in a tapestry-weight cotton.

And the needleweaving over the shisha mirror was right out of the 1960s and 70s. Old doesn't mean "not good!"

Stitching lines that travel in other than straight paths was a good thinking exercise for me. In the process, I began to make notes about ideas I had that came from all that twining and dancing-line stitchery, and I filled an entire sketchbook! I carried the little book with me everywhere and wrote, drew, colored, and pasted frenetically, collecting possibilities that might morph into other stitched pieces along the way. The experience was so fruitful that I'm not sure I ever want to stitch a straight line again!

Then, the results moved to the canvas of what was the "real" sampler. These next shots are of sections of that second, more thoughtful stitched sampler, up close and personal.

I included the funky edge because it is meant to be a fun, playful sampler.

The returning curve below, on right, is a Herringbone Stitch taken to extreme angles, but kept small. It reminds me of prickly thorn vines.

The variegated Satin Stitch surprised me at how much fun it was to stitch. Tedious, yes, but the precision it required was rewarding. The coil is Double Knots in a tapestry-weight cotton.

And the needleweaving over the shisha mirror was right out of the 1960s and 70s. Old doesn't mean "not good!"

Stitching lines that travel in other than straight paths was a good thinking exercise for me. In the process, I began to make notes about ideas I had that came from all that twining and dancing-line stitchery, and I filled an entire sketchbook! I carried the little book with me everywhere and wrote, drew, colored, and pasted frenetically, collecting possibilities that might morph into other stitched pieces along the way. The experience was so fruitful that I'm not sure I ever want to stitch a straight line again!
Wednesday, October 17, 2012
Waving and Curving Lines
The very best part of a basket of threads is the potential there. The colors are lovely, the textures are varied, and nearby is a pin cushion full of needles of every size from a huge size 1 down to a barely-visible beading needle.
I have been thinking about waving, curving lines these last few days. This is a group project for our November Freestyle meeting at Marcia's house. I suggested that we all try to make a sampler, large or small, using wave-ish lines, not straight ones. Any stitch. Any thread. We will make a collection of Freestyle samplers and display them at the April Chapter Meeting of the Knoxville EGA. Unlike most of the neat and tidy samplers made by chapter members, the lines and stitches will roam in our display.
When I stitch lines that are allowed to wander where they may, my entire brain shifts into another gear. I reach for a sketchbook and jot something there, even if it is only a few words or a very rough sketch of an idea to try when this project is done. Everything about me loosens up, and I even smile as I stitch. When I'm working this way, the ideas seem endless.
But in stitching straight lines, however, I stitch myself into the proverbial box that I should be thinking out of (I won't even mention how many rules of grammar were smashed in that sentence). Instead of loosening up the way I do with curving lines, I tighten up— my stitches, my shoulders, I even clamp my arms to my sides. Pathetic. Really.
Which brings me back to the basket of threads. I have some lovely hand-dyed threads that have been calling to me for several weeks, now, and on Monday I put a large group of these autumn-colored hanks and skeins in the play-with-me basket, and have been stitching lines on a piece of discharged linen since then. The linen's original color was pumpkin orange, but it has been reduced to a melon that is not so hard on the eyes. The body of the waving line sampler is almost done. Once the main bones are in place, I can go back and stitch in and out and around these lines. I will share the sampler with you when it is more of a finished work.
Meanwhile, I stitch a little, reach for the sketchbook, go to an old Doodle Cloth or book of stitches and flip through until something interesting pops off the page at me, and I start working on a way to curve it across the melon linen . . .
I can't imagine what I would do for fun without the studio!
I have been thinking about waving, curving lines these last few days. This is a group project for our November Freestyle meeting at Marcia's house. I suggested that we all try to make a sampler, large or small, using wave-ish lines, not straight ones. Any stitch. Any thread. We will make a collection of Freestyle samplers and display them at the April Chapter Meeting of the Knoxville EGA. Unlike most of the neat and tidy samplers made by chapter members, the lines and stitches will roam in our display.
When I stitch lines that are allowed to wander where they may, my entire brain shifts into another gear. I reach for a sketchbook and jot something there, even if it is only a few words or a very rough sketch of an idea to try when this project is done. Everything about me loosens up, and I even smile as I stitch. When I'm working this way, the ideas seem endless.
But in stitching straight lines, however, I stitch myself into the proverbial box that I should be thinking out of (I won't even mention how many rules of grammar were smashed in that sentence). Instead of loosening up the way I do with curving lines, I tighten up— my stitches, my shoulders, I even clamp my arms to my sides. Pathetic. Really.
Which brings me back to the basket of threads. I have some lovely hand-dyed threads that have been calling to me for several weeks, now, and on Monday I put a large group of these autumn-colored hanks and skeins in the play-with-me basket, and have been stitching lines on a piece of discharged linen since then. The linen's original color was pumpkin orange, but it has been reduced to a melon that is not so hard on the eyes. The body of the waving line sampler is almost done. Once the main bones are in place, I can go back and stitch in and out and around these lines. I will share the sampler with you when it is more of a finished work.
Meanwhile, I stitch a little, reach for the sketchbook, go to an old Doodle Cloth or book of stitches and flip through until something interesting pops off the page at me, and I start working on a way to curve it across the melon linen . . .
I can't imagine what I would do for fun without the studio!
Thursday, September 27, 2012
ATCs and Buttonhole Stitches

I have a "collection" of new ATCs. First, maybe I should define "collection." When I was a little girl, one item made a collection. By my mid-twenties, it had to be three of something to rate the collection title. Today, it has to be so many of something that it becomes a serious impediment to progress, either in walking across a room or in visually sweeping a work table— at which point I start questioning whether there is room in a down-sized life for a collection of anything anymore.
I will call this stitched group a series rather than a collection, though. Next month at Freestyle in Knoxville, I am to do a small study on Buttonhole Stitch variations, and I did some serious head-scratching to think of new ways to present old material. I have stacks and stacks of Buttonhole Stitch samplers already (it is, after all, the beauty and variety of the stitch that interests me, not their application in serious work!). So, I chose to make my illustration sampler in pieces rather than to stitch a new single cloth. Then, one for each of my friends, and I can be excused from the charge of over-collecting!
In addition, I have used my hand-carved stamps to provide a little background chatter for the pieces. Solid fabric can be boring. On the other hand, fabric that is too decorative shouts above the stitching. So, the pale-ink stamps seem to work well in that middle ground for me.
Following are some of the Buttonhole Stitch ATCs. The stitch is beyond versatile, so completely flexible and offering arms and legs that can flail out or be tucked in, even laid over and under one another-- what a delightful group of stitches to play with!
First are some Buttonhole Cousins at Play: Sitting on Church Pews. This is about as straight as I ever want to get with lines of stitches.

The next ones are the Buttonhole Cousins truly at play--the ones from the Church Pews, but now that they've been excused, they are cavorting in the sunlight!

One of my favorite ways to use Buttonhole Stitches is to create double lines, with only a tiny space between them.

They undulate beautifully:

The stitch works nicely as an appliqué edge, below holding the painted and stamped cotton in place against the silk ground. And the pockets in the stitch make wonderful places to slip little beads, just for sparkle!

Here is a ruin (rather Roman, don't you think?) that irregularly stitched and interlinked lines have made:

Enjoy! The Buttonhole stitch, paired with imagination and humor, is really fun. No straight lines, please. Give it a chance to dance, run, turn cartwheels . . .
Sunday, March 11, 2012
Composite Stitches: Mountmellick
A composite embroidery stitch is one in which there are several steps to finishing it, often involving some part of more than one stitch. These stitches can sometime be more complicated than the "backbone" stitches, i.e., the chains, buttonholes, and flat stitches that are heart an soul of embroidery basics, but the composite stitches are certainly worth the little bit of extra trouble. In addition, the more steps involved in making a stitch, the more opportunities there are for stitch variation, which is my first love.
Mountmellick Stitch is one of these composite stitches. You may read about the history as well as the traditional thread and fabric choices here and a video tutorial is available. The steps are also well-illustrated in Erica Wilson's classic work, Erica Wilson's Embroidery Book, first published in 1973. Although the video tutorial is very helpful, my personal choice is always the diagram, because I can poke along at my own pace with a drawing until I "get it right."
This is the diagram of Mountmellick Stitch that Erica Wilson provides:

Although it is traditionally a highly textured whitework stitch, it is more interesting when worked in color. Mountmellick thread is not readily available locally for me— I have a small amount left from a purchase years ago, and it resembles a flat matte cotton by DMC (Cotton broderie 4, or a soft, tapestry-weight cotton). But there is a web site (Canadian) that offers it in all four weights Check it out here . A lighter-weight version of this matte cotton is sold by Rainbow Gallery (Matte 18), in colors as well as white. A heavy-weight filet lace thread would also work. Perle cotton (sizes 3 and 5 are nice) or a heavy mercerized cotton (such as Rainbow Gallery's Overture, which is variegated) are other choices. The heavier the thread, the larger and more textured the stitch will be. Multiple strands of cotton floss or flower thread do not work as well as a single, heavier thread. Lighter weights of thread do not show off the details of the stitch very well. And, of course, the traditional stitch would have been worked in white, not color.
Below are some columns of Mountmellick Stitch that show, from left to right, the traditional stitch (with the leg elongated), and successive additions of legs, 2, 3, 4, and 5. This stitch lends itself to the interesting variation of adding more than one little "leg" to the stitch. These are stitched in tapestry cotton:

It can also be flipped and worked in mirror image (here I had to grit my teeth and think in reverse, no small feat for me):

Because it curves well, it is an useful stitch to use in floral designs or in borders. It is a very dense, heavy stitch, and plays well with other textured stitches.
Here I've played with it, stitching a closed form with it:

and substituting a Bullion Stitch for the last step of the stitch:

My stitches are much larger and more clumsy-looking than the proficient Irish stitcher ever intended hers to be, but it suits my style better than tiny, neat stitches would. Hence the heavier thread.
Although the fabric most associated with it is a tightly-woven cotton satin, I prefer a looser weave of linen. The linen fabric holds this stitch very well, and seems to make room for the bulk the stitch, where a tighter weave of fabric often has a strained look when it is finished. Tighter weaves also stress the heavier threads as they are pulled repeatedly through it.
I am glad to see Mountmellick embroidery enjoying a revival of interest. It is a lovely addition to our list of textured stitches.
Mountmellick Stitch is one of these composite stitches. You may read about the history as well as the traditional thread and fabric choices here and a video tutorial is available. The steps are also well-illustrated in Erica Wilson's classic work, Erica Wilson's Embroidery Book, first published in 1973. Although the video tutorial is very helpful, my personal choice is always the diagram, because I can poke along at my own pace with a drawing until I "get it right."
This is the diagram of Mountmellick Stitch that Erica Wilson provides:

Although it is traditionally a highly textured whitework stitch, it is more interesting when worked in color. Mountmellick thread is not readily available locally for me— I have a small amount left from a purchase years ago, and it resembles a flat matte cotton by DMC (Cotton broderie 4, or a soft, tapestry-weight cotton). But there is a web site (Canadian) that offers it in all four weights Check it out here . A lighter-weight version of this matte cotton is sold by Rainbow Gallery (Matte 18), in colors as well as white. A heavy-weight filet lace thread would also work. Perle cotton (sizes 3 and 5 are nice) or a heavy mercerized cotton (such as Rainbow Gallery's Overture, which is variegated) are other choices. The heavier the thread, the larger and more textured the stitch will be. Multiple strands of cotton floss or flower thread do not work as well as a single, heavier thread. Lighter weights of thread do not show off the details of the stitch very well. And, of course, the traditional stitch would have been worked in white, not color.
Below are some columns of Mountmellick Stitch that show, from left to right, the traditional stitch (with the leg elongated), and successive additions of legs, 2, 3, 4, and 5. This stitch lends itself to the interesting variation of adding more than one little "leg" to the stitch. These are stitched in tapestry cotton:

It can also be flipped and worked in mirror image (here I had to grit my teeth and think in reverse, no small feat for me):

Because it curves well, it is an useful stitch to use in floral designs or in borders. It is a very dense, heavy stitch, and plays well with other textured stitches.
Here I've played with it, stitching a closed form with it:

and substituting a Bullion Stitch for the last step of the stitch:

My stitches are much larger and more clumsy-looking than the proficient Irish stitcher ever intended hers to be, but it suits my style better than tiny, neat stitches would. Hence the heavier thread.
Although the fabric most associated with it is a tightly-woven cotton satin, I prefer a looser weave of linen. The linen fabric holds this stitch very well, and seems to make room for the bulk the stitch, where a tighter weave of fabric often has a strained look when it is finished. Tighter weaves also stress the heavier threads as they are pulled repeatedly through it.
I am glad to see Mountmellick embroidery enjoying a revival of interest. It is a lovely addition to our list of textured stitches.
Saturday, March 10, 2012
What I have learned about Bullion Knots

Once again, before I forget all of this . . . Bullions and I go back a long way. We started out with high expectations of one another. The stitch assumed that I would be a neat and patient embroiderer; I thought I could quickly whip this stitch right onto the linen and move immediately to the next stitch on my list. We were both sadly disappointed.
The first thing I learned was to choose the perfect needle. The ideal needle has very little taper, so the crewel needle I was using was unsuitable. The straighter, less-tapering milliner or darning needles were ideal. The needle should be long enough to hold a large number of wraps.
The next thing I learned was how important the wrapping process is. Every wrap must fall carefully in place beside the one before it. No crossing over or under or changing the order of the wrapped threads, and the tension must remain consistent. The wraps had to look like a perfect metal spring to be successful. And this is a hungry stitch, so it takes a surprising amount of thread to complete only a few Bullions.
Invariably, the stitch tangled unless I kept a finger on it with my free hand as I pulled the thread slowly through the tunnel of wraps, then to the back of the fabric.
This Bullion-petal daisy is stitched using a variegated cotton floss, two strands. I found that using more than these two strands was often difficult to control. I think it has something to do with that business of the speed of car wheels as you turn a corner, how the outside wheels require more revolutions than the inside wheels because they cover more distance. So I never use floss longer than 20" or 22" in length, though if I am using a single strand of a perle or a mercerized cotton, the stitching is very smooth and I can use a longer thread.

Bullions may lie nicely flat and make an interesting filling stitch:


Here is an example of very exactly aligned Bullions in cotton floss, two strands, that form a seed pod. I think the over-dyed thread contributes greatly to the charm of this little example:

And when you tire of laying them in flat lines, they can be "scrunched up" into an extreme texture:

It is difficult to see in the photograph, but the Bullions are piled together the way children might pile their blocks, without any attempt to stack or line them neatly in place. Think of the stitch this way: normally you would have as many wraps as you have distance to be covered (maybe 10 wraps for 1/2"), but in the scrunched version, you have far too many wraps for the tiny distance between coming up and going back down into the ground fabric (maybe 20 wraps for only 1/8"). The resulting 20-wrap stitch bunches up and resembles a roly-poly bug.
Extremely long Bullions are interesting. To make them, I use doll-makers needles, which are a dangerous length (I have one that is 6" long, another is 10" long) and without taper, but these sabers allow for 30 to 50 wraps (or more) before I begin to return the needle to the fabric. Holding the wraps between thumb and index finger is the magic that keeps everything in place as the long thread is pulled s-l-o-w-l-y through the tunnel of wraps. This flower has petals made with one of these long needles. The center is a cotton-stuffed silk roundel covered with French Knots:

Besides neat petals, these long-ish Bullions are great for areas of over-the-top textured, because the loops can twist out of control when the needle is wrapped dozens of times, and the result is a run-amok look that is difficult to achieve within traditional, orderly embroidery. Variegated thread adds delightfully to the chaos.
On the other hand, flat, mannerly Bullions can be used to create grids,

and they might also present a nice "checkerboard" effect (in perle cotton #3, below).

They may be used to make large, textured Cross Stitches,


and these are stitched in a variety of cottons and rayons (here I always expect to see Moses being pulled from his basket floating amongst the bull rushes):

I also discovered that by going back to the crewel needle, I could make Bullions take on the shape of seed pods, an effect I have exploited in this abstraction of a flower head:
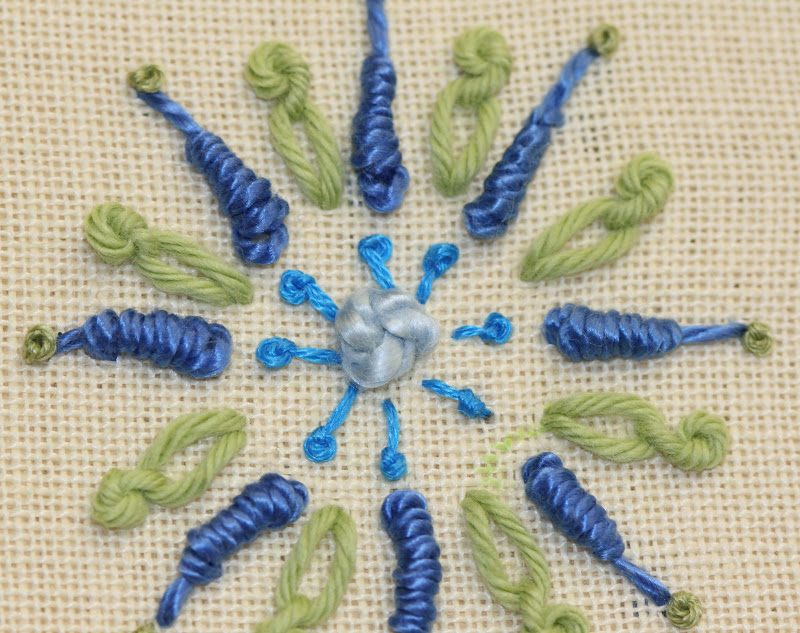
In addition, a Bullion may be substituted for a part of a composite stitch such as Mountmellick:


It can also make one half of a detached chain stitch, which is useful in creating textured foliage (shown below). The stitch has a tendency to curl to one side or another, and this curl can be controlled by wrapping the threads either in a clockwise or counter-clockwise motion.

Here the Bullion Stitch is added to a Fly Stitch:

The motions of making the basic Bullion stitch are very similar to those of a Detached Buttonhole stitch (used a great deal in needle weaving), with the addition of a little ridge on one side of the stitch that gives it a woven look. This is obtained by giving the loop a twist as it goes over the needle:

The only way to learn to make Bullions is to sit and make them for hours on end. When I decided, in my struggle with the stitch, that I would be the winner in this pitched battle, I even took it to church with me. I was the organist at the church, and as the organ was placed in a well in the choir loft behind a screen, I felt perfectly safe in stitching during the sermon and the morning announcements. I was much younger and could move faster than I do today, or I would not have tried this, as there is a good bit of coordinated movement in throwing down an embroidery hoop, pulling on the organ stops, and playing the appropriate music at the appropriate time. Somehow, it worked. That was the Summer Of The Bullion.
Having taken a great deal of time in learning the stitch, I began to look for ways to use it everywhere-- and the more looking I did, the more opportunities I found.
Good Stitching!
Thursday, December 1, 2011
What I have learned about French Knots

Today, when I was squeezing yet one more long-stemmed French Knot into a smallish corner of a palm-sized piece, it occurred to me that I ought to write about knots before I forget everything I've learned! This concern for my memory of both the important and the unimportant came about when it took me an entire day to remember the name of the very common Feather Stitch! Celebrating birthdays is suddenly not such a celebratory moment.
I have learned that knots are tricky and unforgiving. I get one chance at them, and if I garble the line of thread at any point, I don't have the opportunity to back out of the mess and start over. My options are: (a) cut it out c-a-r-e-f-u-l-l-y and start over; (b) sew another stitch (a bigger knot, or a satin stitch shape) on top of it in a fatter thread until the unfortunate knotted mess is completely covered up; or (c) come up with a creative appliqué. Usually I opt for (a), though I can point out several cover-ups that actually changed the direction of the piece entirely! I think my Muse is often impatient with me and resorts to tangling the threads I am using until I am forced to stop and listen to her.
Yes, another digression.
French Knots have no more personality than a dial tone when they stand by themselves, but in a cluster, or stretched across a space, they can have presence and even textural importance. I love texture, so I am prone to wrap the needle many times, giving me a large, sometimes shaggy knot. Jacqueline Enthoven, however, says a French Knot should be wrapped only one time around the needle. If I want a larger knot, she continues, I should simply double the thread. Or treble, it would follow. So, the next thing I learned about French Knots is that when I double the thread and wrap the needle only once, the shape of the knot is tidy and it does not fall over to one side. It is possible that the multiple-wraps leave the stitch exhausted under the weight of all those loops and they fall gasping to one side the way Victorian ladies took to their fainting couches.
French Knots have a habit of disappearing when I do not move my needle over just slightly as I enter the fabric from the right side to carry the thread to the back. In fact, they simply pop right through the little hole they sit above and I'm left looking at the place where the knot was and wondering where my stitch has gone!
Most fortunately, French Knots play well with other stitches. Stitches that make long, winding lines across the linen and leave open pockets in the process cry out for companionable French Knots to join them. Look at the Herringbone stitch. In other embroiderers' worlds, they are nicely even and controlled little children. In my world, they run, leap, curl and change shapes as they cavort across the linen:

This rather chubby Cretan Stitch benefits from a French Knot in its house-shaped center:

Buttonhole stitches, particularly uneven ones, provide interesting "cubby holes" for the knots, and they almost look like cells as seen under a microscope when multiple rows are combined. Square (or Open) Chain stitches read the same way:

Small, tightly-made knots may be cradled in the curve of Feather or Fly Stitch, or decorate the ends, like some of the more delicate weeds in my garden:

Here the knot has been used as a substitution for the terminating straight stitch normally found at one end of a Detached Chain stitch:

These slightly open Detached Chain stitches also use the knot as a tacking stitch:

Two lines of Buttonhole stitches have been "dotted" with French Knots in contrast colors:


and their high-texture makes for interesting filling stitches--tree foliage is well-represented in variegated thread here:

It is even possible to stitch small knots into larger ones. These below are pale blue perle cotton #8 sewn into the darker perle cotton #3:

By adding a stem to the knot, the lowly French Knot becomes a tiny flower:

With the help of metallic thread, the knot can have loops added to it, as well (it is tension that makes this work, tension and the patience of Job):


and when clustered tightly together can give the appearance of small colonies of fungi or field flowers:

There are so many more ways to use French Knots-- and this is the simplest of all the knots.
I have also learned how lovely the complicated knots can be, but I believe that will wait for another day and another pot of tea. Right now, I have a huge box of samplers spread across a table in the studio, and rather than putting them away, I want to go and sit with them and enjoy remembering the times I made them. Stitched samplers can be ever so entertaining!
Subscribe to:
Posts (Atom)