Tuesday, March 20, 2012

Spring Life-Cleaning

It is the Spring coming so early, I believe, that has put me on to nesting— moving furniture in all the rooms of the house, planting new peonies in the garden, moving hydrangeas, cleaning out closets, going through every nook and cranny of the studio to see how space might be better used, getting rid of materials I no longer care to use and wondering why I don't want to work in these mediums anymore . . . turning over every aspect of my life and trying to set myself in order.  Spring Life-Cleaning.

I excuse this enthusiasm for nesting by remembering that I could not do any cleaning last year at this time.  But somehow, even that does not explain this burst of interest in setting things in place.

I looked at a weather map last night and was horrified at what I saw.  The Jet Stream made a roller-coaster up-and-down of the continent.  As much as I hated seeing the Spring come two months early, I hate even more the idea that this roller-coaster line dividing snow in the west from heat in the east could suddenly reverse its shape, and the high pressure might move frigid Arctic air and snow over the fragile and very bloomy Spring!


Frost wrote that "Nothing gold can stay," though I'm beginning to think that "gold" could mean the loveliness of Spring as well as the burnished tones of Autumn.  I wonder if the nesting instinct is an unconscious attempt to make a sheltering place for the Spring, should this High/Low Pressure system flip-flop and we lose the richness of too much spring at one time?


An interesting sidebar to this too-warm weather in North Georgia: the pollen count for Atlanta was at an all-time record of 8,164 yesterday!  My sinuses were telling me that something like this might be happening.  There are two dozen steps between kitchen and studio doors, and in that short trip, I must collect pollen enough to fertilize an entire orchard!

Time to dig out the surgical masks.  I wish someone would manufacture these in skin tones, with nostrils and lips drawn on them so I didn't look like such a dweeb wearing one.


Monday, March 12, 2012

A thought . . .

. . . about the internet and e-mail.  I can't imagine living without it today, but how did I get this way?

Doesn't matter.  E-mail has been down, and I have spent a week of my life in back-and-forth communication with my provider over why I cannot use my password anymore.  A patched-up solution has been found, but there were days when I asked myself if I really needed all this stress— and the answer was, "Of course, of course!  How else will you contact your friends?"

Now, a cup of tea and some soothing music.  Debussy, I think.

Sunday, March 11, 2012

Composite Stitches: Mountmellick

A composite embroidery stitch is one in which there are several steps to finishing it, often involving some part of more than one stitch.  These stitches can sometime be more complicated than the "backbone" stitches, i.e., the chains, buttonholes, and flat stitches that are heart an soul of embroidery basics, but the composite stitches are certainly worth the little bit of extra trouble.  In addition, the more steps involved in making a stitch,  the more opportunities there are for stitch variation, which is my first love.

Mountmellick Stitch is one of these composite stitches.  You may read about the history as well as the traditional thread and fabric choices here  and a video tutorial is available.  The steps are also well-illustrated in Erica Wilson's classic work, Erica Wilson's Embroidery Book, first published in 1973.  Although the video tutorial is very helpful, my personal choice is always the diagram, because I can poke along at my own pace with a drawing until I "get it right."

This is the diagram of Mountmellick Stitch that Erica Wilson provides:


Although it is traditionally a highly textured whitework stitch, it is more interesting when worked in color.  Mountmellick thread is not readily available locally for me— I have a small amount left from a purchase years ago, and it resembles a flat matte cotton by DMC (Cotton broderie 4, or a soft, tapestry-weight cotton).  But there is a web site (Canadian) that offers it in all four weights  Check it out here . A lighter-weight version of this matte cotton is sold by Rainbow Gallery (Matte 18), in colors as well as white.  A heavy-weight filet lace thread would also work.  Perle cotton (sizes 3 and 5 are nice) or a heavy mercerized cotton (such as Rainbow Gallery's Overture, which is variegated) are other choices.  The heavier the thread, the larger and more textured the stitch will be.  Multiple strands of cotton floss or flower thread do not work as well as a single, heavier thread.  Lighter weights of thread do not show off the details of the stitch very well.  And, of course, the traditional stitch would have been worked in white, not color.

Below are some columns of Mountmellick Stitch that show, from left to right, the traditional stitch (with the leg elongated), and successive additions of legs, 2, 3, 4, and 5.  This stitch lends itself to the interesting variation of adding more than one little "leg" to the stitch. These are stitched in tapestry cotton:


It can also be flipped and worked in mirror image (here I had to grit my teeth and think in reverse, no small feat for me):


Because it curves well, it is an useful stitch to use in floral designs or in borders.  It is a very dense, heavy stitch, and plays well with other textured stitches.

Here I've played with it, stitching a closed form with it:


and substituting a Bullion Stitch for the last step of the stitch:


My stitches are much larger and more clumsy-looking than the proficient Irish stitcher ever intended hers to be, but it suits my style better than tiny, neat stitches would.  Hence the heavier thread.

Although the fabric most associated with it is a tightly-woven cotton satin, I prefer a looser weave of linen.  The linen fabric holds this stitch very well, and seems to make room for the bulk the stitch, where a tighter weave of fabric often has a strained look when it is finished.  Tighter weaves also stress the heavier threads as they are pulled repeatedly through it.

I am glad to see Mountmellick embroidery enjoying a revival of interest.  It is a lovely addition to our list of textured stitches.

Saturday, March 10, 2012

What I have learned about Bullion Knots


Once again, before I forget all of this . . .  Bullions and I go back a long way.  We started out with high expectations of one another.  The stitch assumed that I would be a neat and patient embroiderer; I thought I could quickly whip this stitch right onto the linen and move immediately to the next stitch on my list.  We were both sadly disappointed.

The first thing I learned was to choose the perfect needle.  The ideal needle has very little taper, so the crewel needle I was using was unsuitable.  The straighter, less-tapering milliner or darning needles were ideal.  The needle should be long enough to hold a large number of wraps.

The next thing I learned was how important the wrapping process is.  Every wrap must fall carefully in place beside the one before it.  No crossing over or under or changing the order of the wrapped threads, and the tension must remain consistent.  The wraps had to look like a perfect metal spring to be successful.  And this is a hungry stitch, so it takes a surprising amount of thread to complete only a few Bullions.

Invariably, the stitch  tangled unless I kept a finger on it with my free hand as I pulled the thread slowly through the tunnel of wraps, then to the back of the fabric.

This Bullion-petal daisy is stitched using a variegated cotton floss, two strands.  I found that using more than these two strands was often difficult to control.  I think it has something to do with that business of the speed of car wheels as you turn a corner, how the outside wheels require more revolutions than the inside wheels because they cover more distance.  So I never use floss longer than 20" or 22" in length, though if I am using a single strand of a perle or a mercerized cotton, the stitching is very smooth and I can use a longer thread.


Bullions may lie nicely flat and make an interesting filling stitch:


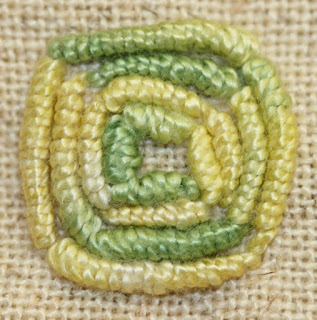
Here is an example of very exactly aligned Bullions in cotton floss, two strands, that form a seed pod.  I think the over-dyed thread contributes greatly to the charm of this little example:


And when you tire of laying them in flat lines, they can be "scrunched up" into an extreme texture:


It is difficult to see in the photograph, but the Bullions are piled together the way children might pile their blocks, without any attempt to stack or line them neatly in place.  Think of the stitch this way:  normally you would have as many wraps as you have distance to be covered (maybe 10 wraps for 1/2"), but in the scrunched version, you have far too many wraps for the tiny distance between coming up and going back down into the ground fabric (maybe 20 wraps for only 1/8").  The resulting 20-wrap stitch bunches up and resembles a roly-poly bug.

Extremely long Bullions are interesting.  To make them, I use doll-makers needles, which are a dangerous length (I have one that is 6" long, another is 10" long) and without taper, but these sabers allow for 30 to 50 wraps (or more) before I begin to return the needle to the fabric.  Holding the wraps between thumb and index finger is the magic that keeps everything in place as the long thread is pulled s-l-o-w-l-y through the tunnel of wraps.  This flower has petals made with one of these long needles.  The center is a cotton-stuffed silk roundel covered with French Knots:


Besides neat petals, these long-ish Bullions are great for areas of over-the-top textured, because the loops can twist out of control when the needle is wrapped dozens of times, and the result is a run-amok look that is difficult to achieve within traditional, orderly embroidery.  Variegated thread adds delightfully to the chaos.

On the other hand, flat, mannerly Bullions can be used to create grids,


and they might also present a nice "checkerboard" effect (in perle cotton #3, below). 


They may be used to make large, textured Cross Stitches,


and a tail may be added as part of the final tacking stitch (just move the needle away from the point you would normally terminate the stitch).  This example is in rough metallic thread,


and these are stitched in a variety of cottons and rayons (here I always expect to see Moses being pulled from his basket floating amongst the bull rushes):


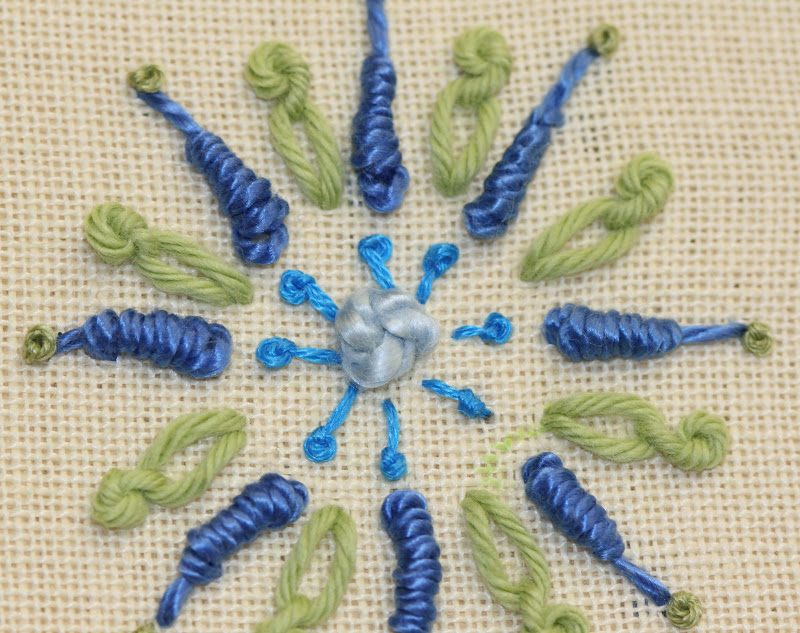
I also discovered that by going back to the crewel needle, I could make Bullions take on the shape of seed pods, an effect I have exploited in this abstraction of a flower head:


In addition, a Bullion may be substituted for a part of a composite stitch such as Mountmellick:


It can also make one half of a detached chain stitch, which is useful in creating textured foliage (shown below).  The stitch has a tendency to curl to one side or another, and this curl can be controlled by wrapping the threads either in a clockwise or counter-clockwise motion.


Here the Bullion Stitch is added to a Fly Stitch:


The motions of making the basic Bullion stitch are very similar to those of a Detached Buttonhole stitch (used a great deal in needle weaving), with the addition of a little ridge on one side of the stitch that gives it a woven look.  This is obtained by giving the loop a twist as it goes over the needle:


The only way to learn to make Bullions is to sit and make them for hours on end. When I decided, in my struggle with the stitch, that I would be the winner in this pitched battle, I even took it to church with me.  I was the organist at the church, and as the organ was placed in a well in the choir loft behind a screen, I felt perfectly safe in stitching during the sermon and the morning announcements.  I was much younger and could move faster than I do today, or I would not have tried this, as there is a good bit of coordinated movement in throwing down an embroidery hoop, pulling on the organ stops, and playing the appropriate music at the appropriate time.  Somehow, it worked.  That was the Summer Of The  Bullion.

Having taken a great deal of time in learning the stitch, I began to look for ways to use it everywhere-- and the more looking I did, the more opportunities I found.

Good Stitching!


Friday, March 9, 2012

Sketchbook: Bugs!


Confession time:  I am a fan of the Natural World only up to a point.  When we pass by birds, flowers and trees, mosses and ferns, or we have a few days at the beach, stand under starry skies or enjoy spring rains, I cannot soak up enough of these beautiful moments.  Eventually, however, the insect world has to be acknowledged.  And there I slam on the brakes.  Born, raised, and always living in the Deep South, the Natural World has so kindly offered me a broad pallet of insects to invade my worst nightmares.  I remember, as a small child, playing barefoot in the yard beside our house.  I must have been concentrating quite deeply on my game, because I suddenly noticed caterpillars crawling around me.  Marching toward me in what seemed to my child's mind an unending deployment, an army of these black and yellow creepy-crawlies invaded my play space under the trees.  I clambered to the top of a chair and began screaming for my mother to come and rescue me.  It hasn't gotten much better since then, though I don't climb on chairs anymore.  I still scream.

One day, however, I decided to take this unreasonable revulsion and turn it into a smile via my sketchbook.  If you can laugh about something, it isn't so terrifying, I reasoned.  I gave the enemy personality, even human clothing, and had a good time with them.


I think about my friend Carol and how unafraid she is around bugs, how truly interested she is in them, and I try a little harder to loosen up.  But, in truth, I still don't like them.

I've been adding sketches of bugs for several years, now.  Trying to be open-minded.  Sorry, bugs.  Really.

Wednesday, March 7, 2012

Purposeless Play

Purposeless play -- this play is an affirmation of life -- not an attempt to bring order out of chaos nor to suggest improvement in creation.  but simply a way of waking up to the very life we are living, which is so excellent once one gets one's mind and desires out of the way and lets it act of its own accord.
                                        — John Cage

Purposeless Play, for John Cage, was a way of life.  Do you know of him?  He made his mark on American avante garde music of the 1960s, which is where I first knew of him, but he did not limit himself to a single medium.  All of the creative world was his playground, and his lists of accomplishments is long and delightfully varied.  He is someone you love or hate, no middle ground possible with him!

I like his idea of Purposeless Play.  Today I will take you along with me on a trip to my studio, and we shall indulge in a little soul-improving, Purposeless Play.  Bring your teacup or mug and Let us go then, you and I . . .  (sorry, I have just finished reading The Weird Sisters, and while I do not eschew Shakespeare, I choose T.S. Eliot as my muse).  Further, do not ask, "What is it?"  Let us go and make our visit.


Ahem.

Watercolor play today.  I used a tutorial by Carla Sonheim on her blog "Snowball Journals" to play at painting flowers.  See this interesting process here.  February 22, 2012 is the posting date.

Step one was to put blobs of paint on paper, Letting it dry completely.  I used a long piece of landscape watercolor paper and a watercolor postcard (for my sister).  Step two was to paint around the blobs with gesso, cutting back into the gesso with the pointed end of the paintbrush handle, making textured circles around the blobs of color.  I am fascinated by the texture the gesso makes above the blobs of color.


Then, to the gym for Yoga Stretch exercise class while everything dried.

After lunch and a shower, back to the Studio.  Steps three forward involved drawing out the flowers and creating a background, both of which I did with pencil.  Carla has a marvelous loose, flowing style, and I tend to over work and add little bits of color that mix at a distance.  I could not resist pulling out colored pencils, dye pencils, and graphitint pencils as well as a bit of fine pen for this.  These are my results:


All the time I was working, I had fabric and thread on my mind.  I can't help it; I am hard wired to stitch!  I have some ideas about using this "purposeless play" for stitching some loose, not-a-bit-like-reality flowers (I always think of those sorts of flowers as "Fantasy Flowers From A Far Planet").  Will check back in with results.

Tuesday, March 6, 2012

Continuing On The Soapbox

Isn't it funny, the way a subject comes up and suddenly you're aware of that subject in everything you read or hear for weeks afterward?  It is as if mysterious forces join in the controversy in subtle ways.

I picked up a copy of (apron-ology) yesterday and noted how many aprons used vintage linens to create some charming new aprons.  This quote (p. 102, vol. 4) seemed to sum up the feelings of others as well as myself on the subject:

The handwork that went into
embroidered linens is 
exceptional and well worth
saving.
No matter the stain or tear,
there is always a way to
salvage
pieces of the past.

     —Renee Dahl

The entire magazine is eye candy, with original designs, new or old fabrics, and some fresh ways of looking at not just the aprons themselves, but the idea of making aprons fit into 21st century life.  I cannot say enough good things about this magazine.  It has given me ideas of ways to play with some of my vintage treasures, perhaps to make an apron for Bethy— the fancy, lacy kind, of course.  Last week she went to school as her favorite character in a book, and she chose Fancy Nancy, complete with feather boa!  A perfect fit!

Sunday, March 4, 2012

Well. . . .

. . . . maybe I was a bit hasty about my tirade against chopping up and glueing vintage embroideries (shudder suppressed here).  One man's trash is another's treasure, etc.  I'm trying to get a grip.  It's time I turned my energies to digging in the garden.

Thursday, March 1, 2012

Uses for Vintage Embroidery

I read an article today about using Vintage Embroidery in fiber art/mixed media art by cutting up the pieces and doing various things with it— but I stopped in my tracks when I got to the part about gluing down these old embroideries to a mixed media project.  There was something about gel and gesso in the next paragraph, but I had paled and begun to hyperventilate by that time and didn't catch the gist what further crimes were being detailed.

After all the hours of work that went in to creating the dresser scarves, hankies, tablecloths, bedspreads and clothing embellishment, I just couldn't do such a thing.  In my little world,

Glue + Fabric = no No NO!

There are enough vintage pieces that are soiled or damaged (when I see where oily hands have been wiped on some heavily embroidered doily my teeth clench together), and these can be cut up and the pieces SEWN into a new creation.  Glueing shows a marked lack of respect for the efforts of women who spent so many hours bent over their work in the name of beautifying their home and making a warm, nurturing environment for their family.  There should be a better way to gently use these damaged pieces.

Ah, I hear you asking, "Such as?"

Wrist Cuffs.  Christmas Stockings.  Pockets for totes or a little girl's dress.  Crazy Quilting.  Book covers (I am thinking about the kind that have replaceable notebooks inside the covers).  I have a friend who used some of these pieces in a beautiful pair of appliqued and embellished curtains for her dining room.  Rebecca Ringquist uses vintage linens as bases for her samplers (intricate and a huge dose of fun) and compelling story embroideries.  I even used the side panels of an embroidered bedspread that had been ripped beyond repair to make a pair of valances for the guest bedroom that Bethy uses when she spends the night with us (she loves the blue birds swooping down to the lilac flowers above the windows).  Mandy Pattullo has made recycling textiles a pure art form.

As for the undamaged pieces: while  there is nothing wrong with recycling/upcycling vintage linens, the beautiful old pieces in good repair have another life, in the right hands.  The most interesting home decor isn't always from the pages of the latest design magazines.

Recycle Responsibly!